If you are thinking of installing Windows 11 but your pc or computer is outdated or unsupported then in this post I am going to guide you on how can you install Windows 11 on unsupported systems. You can install Windows 11 on an unsupported system but can install via window updates. As in, you need a bootable USB flash drive or ISO File to install or upgrade manually.
In the documentation of window 11 there is no mention of, will it be supported or not. Though as per the company, Only the organization can install Windows 11 on unsupported systems. But you can still install or upgrade to Windows 11 on the unsupported device at your own risk as there will be no security updates and no guarantees of system stability or drive compatibility. Microsoft marks a device as an unsupported state that does not meet the minimum system requirements which means you will not get any updates from window updates.
In this article, you will get to know how to install windows 11 on an unsupported computer or laptop. It's not advised to use this method unless you are aware of the risks and realise that stability, compatibility, and updates are not assured since the device does not officially support the new version of Windows.
To begin the setup procedure with a USB flash drive using the ISO file to complete a clean installation, you must first make a bootable media using a third-party program like Rufus or Command Prompt.
Additionally, you must ensure that the device can boot from USB, which necessitates changing the UEFI settings. You must visit the support website of your computer's manufacturer for more detailed information because these settings vary between most systems.
Follow these steps to install Windows 11 on an unsupported computer:
- Insert the Window 11 USB Flash drive and start the unsupported system.
- Press any key to move forward.
- Press SHIFT + F10 to open cmd(Command Prompt)
- Type the command regedit and press enter.

- Now go to following path:
HKEY_LOCAL_MACHINE\SYSTEM\Setup
- Select the setup folder, right click on it, click on new and then key option from the list.

- Enter the name of the key(Folder) as LabConfig and Click the Enter button.
- Now right-click on the LabConfig folder, Select NEW and then the DWORD(32-bit) from the list.
- Enter the name key as BypassTPMCheck and Click on the Enter button
- Now open the key and set its value from 0 to 1;

Click the OK button to save it.
Press the Next button and start install window 11 on unsupported systems.


- Click on the "I don't have a product key" if you don't have a product key else you can enter it.

- Check the license terms and click on next
-
Select the second option "Custom: Install Window only(Advanced)"
-
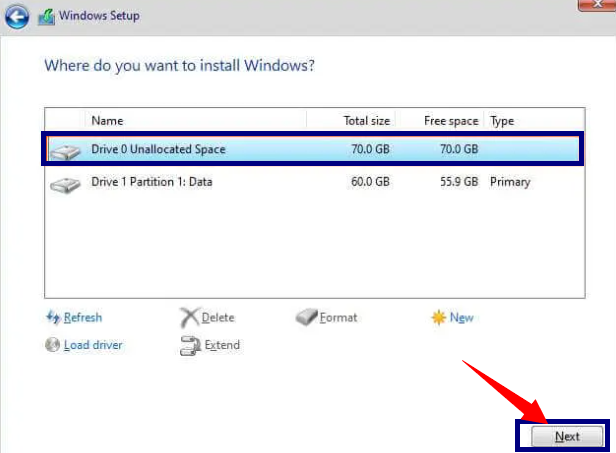
Now select the partition of your hard drive in which you would like to
install windows 11 and click on Delete.(Note: When you select the partition,
it will erase all stored data in the partition.)
-
Select the "Drive 0 unallocated space" and click on next to proceed.
-
Now first page of windows 11 installation will appear in which you have to
select your country or region and click on
Yes.
-
Select the keyboard layout setting and click on
Yes.
- Skip the configuration of second keyboard layout.
- If you have wifi connection, you can connect to your wifi by entering the password.
-
Now name your pc and click on next. (Your device will be restarted
automatically)
- Now click on the Setup for personal use option and click on the Next button.
-
Enter your Microsoft account and password to create an account and click on
next.
-
Now it's time to create a pin for Windows 11 therefore click on
create a PIN.
-
Enter a four-digit PIN(including letters and symbols) and click the ok.
-
Select the Restore or Set up as a new Device and click the next button.
-
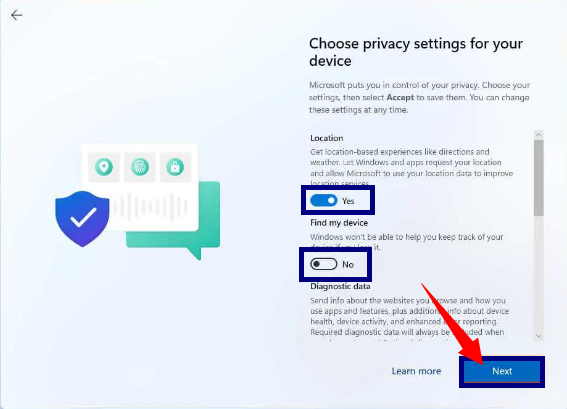
Check the privacy settings, change it by a toggle switch for each option and
click the next button.
-
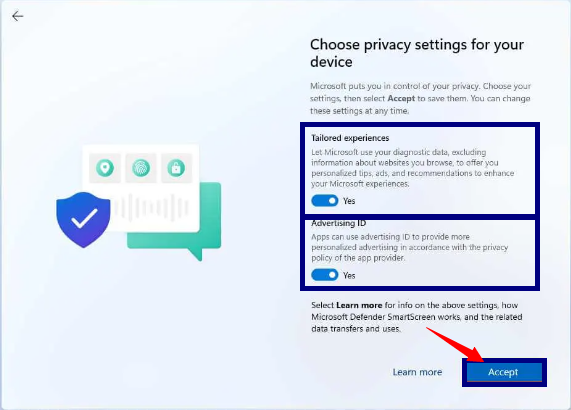
Click the Next button again.
- Click on Accept button.
- It is optional to customize your system therefore you can skip it.
- It is optional to backup your files with OneDrive so you can skip it by selecting Don't Backup and click on next button.
-
Click on No, Thanks for skipping the Microsoft365 setup and click on No Thanks.
- Once you complete the above steps, Windows 11 will be installed in your unsupported system.